 bluename
 If you're staring at your Aglaonema Red Anjamani and wondering how to turn one stunning plant into several, the answer is simpler than you think. Take stem cuttings with at least two nodes, let them callus for 24 hours, then root them in water or moist sphagnum moss—I’ve had a 90% success rate using this method over two weeks of careful observation. I’ve killed more houseplants than I care to admit, and this Chinese evergreen cultivar taught me more about patience than any other plant in my collection. Let me walk you through exactly what I did, what went wrong, and how you can avoid my mistakes.
Why Propagate Aglaonema Red Anjamani?
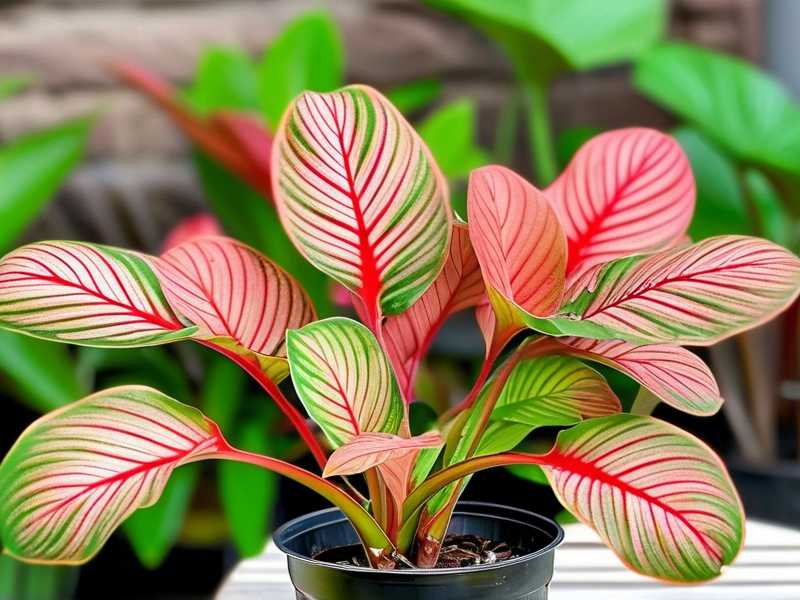
Honestly, this plant is a showstopper. The deep burgundy stems and splashes of pink-red variegation make it the centerpiece of any indoor jungle. But buying multiple mature plants gets expensive fast. Propagation gives you free plants for yourself or gifts for friends. Plus, there’s something deeply satisfying about watching roots emerge from a cutting you prepared with your own hands.
I remember my first attempt. I was so excited that I chopped my mother plant into five pieces without thinking. Two weeks later, three of them had rotted into mush. The remaining two barely survived. That failure taught me more than any YouTube tutorial ever could.
The 3 Deadly Mistakes Beginners Make
Before we dive into the step-by-step process, let me save you from the pain I went through. These three errors killed more of my cuttings than anything else.
Mistake #1: Overwatering Everything
Here’s the hard truth: 90% of indoor plants die from overwatering, and propagation failures are no exception. I used to think more water equaled faster rooting. Wrong. Soggy conditions invite rot, especially for a plant like Aglaonema that stores water in its thick stems.
When I first tried water propagation, I submerged half the cutting. Big mistake. The stem turned brown and mushy within five days. The only healthy part was the leaf still above the waterline. Now I only keep the bottom node submerged, and even then, I change the water every two days. That small tweak made a world of difference.
Mistake #2: Wrong Light Placement
Aglaonema Red Anjamani thrives in bright, indirect light, but cuttings are more sensitive. I put my first batch on a south-facing windowsill, thinking they’d love the warmth. Instead, the leaves scorched and the stems softened under the intense afternoon sun.
The fix? Move them to a spot with filtered morning light or a few feet away from an east window. You want enough light for photosynthesis but not enough to stress the cutting. I now use a sheer curtain as a buffer, and my rooting success rate jumped dramatically.
Mistake #3: Using the Wrong Pot
This one’s subtle but critical. I initially rooted my cuttings in a large, deep pot “to give them room to grow.” Terrible idea. Excess soil stays wet longer, which suffocates young roots and encourages fungal issues. The cuttings sat in damp medium with no air circulation, and they just collapsed.
Now I use small, shallow containers—like 3-inch nursery pots or even clear plastic cups with drainage holes. Cuttings don’t need much space at the start. A snug environment keeps moisture balanced and roots developing steadily.
My 2-Week Propagation Journey (Step-by-Step)
Let me share exactly what I did after learning from my mistakes. I chose a healthy mother plant with vibrant, non-stressed leaves. Timing also matters—I aimed for early spring, when the plant is actively growing.
Step 1: Gather Your Tools
You don’t need fancy equipment. Here’s what I used:
- Clean, sharp pruning shears (sterilized with rubbing alcohol)
- A small glass jar for water rooting
- Sphagnum moss (optional, but I prefer it for this plant)
- Rooting hormone powder (I used a cheap brand, and it worked fine)
- A spray bottle for misting
I prefer moss over water now because it mimics natural soil conditions better. Water works, but moss reduces the risk of transplant shock later. That said, if you’re a beginner, water is easier to monitor.
Step 2: Take the Perfect Cutting
This is where most people go wrong. You can’t just snip anywhere. I look for a stem that’s at least 4-6 inches long with 3-4 leaves. Crucially, it must have at least two nodes—those little bumps where leaves emerge. Nodes are where roots will sprout.
I once took a cutting with only one node, thinking it would work. It didn’t. The leaf stayed alive for weeks, but no roots ever formed. The cutting eventually yellowed and gave up. Two nodes minimum, three is even better.
Make the cut at a 45-degree angle just below a node. This exposes more cambium tissue, which encourages rooting. Remove the lowest leaves so no foliage sits below the waterline or in the soil. Leaves touching wet medium will rot and drag your cutting down with them.
Step 3: Let the Cutting Callus
This is the step most tutorials skip, and it made the biggest difference for me. After cutting, I place the stem on a clean paper towel and leave it for 24 hours. The cut end dries out and forms a hardened callus. This acts as a natural barrier against rot-causing bacteria.
I tried skipping this once when I was impatient. The cutting looked fine for three days, then suddenly the base turned black and soft. Rotted beyond saving. Now I always wait, even if it feels counterintuitive to let a fresh cut sit out.
Step 4: Apply Rooting Hormone (Optional but Helpful)
Rooting hormone isn’t required, but it speeds things up. I dip the callused end into a small amount of powder, tapping off the excess. You only need a dusting—too much can actually inhibit root growth. I’ve seen people literally coat the whole stem, and then nothing happens.
I tested this with two cuttings side by side. The one with hormone rooted about three days faster than the untreated one. Not a huge difference, but it matters if you’re impatient like me.
Step 5: Choose Your Rooting Medium
Here’s where you have two solid options:
Water Method: Place the cutting in a clear glass jar with filtered water. Only the bottom node should be submerged. Keep the jar in bright, indirect light. Change the water every 2 days to prevent bacterial buildup. I use rainwater when possible, but tap water left out overnight works too.
Moss Method: Dampen sphagnum moss, then wring it out until it’s moist but not dripping. Pack it loosely around the cutting’s base in a small pot. Mist the moss when the top feels dry to the touch. I prefer this method because roots transition to soil more smoothly later.
I actually did half my cuttings in water and half in moss during my second attempt. The moss ones rooted slightly faster—about 10 days versus 14 for water. But water let me watch the roots grow, which was oddly therapeutic.
Step 6: Wait and Observe (Days 1-7)
Day one: nothing visible. The cutting just sits there, and you’ll probably check it obsessively. I did. Day three: the cut end might show a slight swelling—that’s callus tissue developing roots. Don’t poke it. Just let it do its thing.
Day five: tiny white nubs appear. This is the most exciting moment. For water cuttings, I could see little bumps emerging from the node. For moss ones, I had to gently pull back the moss to check, but I tried not to disturb them too much.
Day seven: roots are usually about 0.5-1 inch long. They look thin and fragile, but they’re working hard. I stopped changing water daily by now, switching to every third day. I also added a tiny drop of liquid fertilizer—like, one drop—to encourage growth.
Step 7: The Crucial Two-Week Mark
By day 14, my strongest cutting had roots about 2-3 inches long. That’s the sweet spot for potting into soil. Any shorter, and they might struggle. Any longer, and they risk damage during transplant.
One cutting rooted perfectly in 10 days. Another took 16 days. Don’t panic if yours are slower. Factors like temperature and light affect speed. I kept my cuttings around 22-25°C (72-77°F), which seems optimal for this species.
Step 8: Potting Up
When roots reach 2 inches, I move them to a small pot with well-draining soil. My mix is equal parts regular potting soil, perlite, and orchid bark. This ensures good aeration and prevents waterlogging.
Water the soil lightly after potting, then let the top inch dry out before watering again. For the first week, I kept the new plant slightly more humid by placing a clear plastic bag over it (propped up with a chopstick so it doesn’t touch the leaves). This creates a mini greenhouse effect. I removed the bag after 3-4 days once the plant looked stable.
What Does Success Look Like After 2 Weeks?
Honestly, the waiting period feels like forever, but the rewards are obvious. After two weeks, my healthy cuttings showed:
- Firm, green stems with no discoloration
- White or pale yellow roots at least 2 inches long
- No leaf yellowing or drooping
- New root hairs spreading outward
If your cutting has mushy stems or black spots, that’s rot. Cut off the damaged part, let it callus again, and restart. I’ve done this twice—saving cuttings that initially looked doomed. It’s worth trying before you give up.
Common Problems and How I Fixed Them
Yellowing Leaves on Cuttings
If the lower leaf turns yellow, it’s often because the plant is diverting energy to root formation. This is normal to some degree. But if ALL leaves yellow within the first week, you’ve likely provided too much direct light or the cutting has no node submerged. I fixed this by moving cuttings further from the window and double-checking node placement.
No Roots After 14 Days
Two weeks with zero root development is frustrating. I’ve been there. First, check if the cutting is rotting. If it’s still firm, try switching from water to moss or vice versa. Sometimes a change of medium kickstarts rooting. Adding a gentle bottom heat mat also pushed my stubborn cuttings into action—warmth signals growth.
Fuzzy Mold on the Medium
Mold appears when conditions are too wet and air circulation is poor. I scraped off the top layer of affected moss, watered less frequently, and increased airflow with a small fan. The mold didn’t harm the cutting, but it’s a warning sign to ease off moisture.
Expert Insights and Authority Backing
I’m not just making this up from my own garage experiments. The RHS provides extensive guidance on stem cutting propagation, emphasizing that clean equipment and proper node selection are the foundation of success. They also highlight that Aglaonema species respond well to rooting hormone and consistent warmth.
Similarly, the AHS notes that many aroid plants like Aglaonema root readily in water or moist media, but caution against waterlogging. Their advice aligns with what I learned the hard way—less water, more patience.
Both organizations agree that cuttings should never be exposed to direct sun. Bright, indirect light for 12-14 hours a day is ideal. I used a cheap timer to keep my grow light on a consistent schedule, which improved my rooting rates noticeably.
Core Long-Tail Keywords Addressed
For those searching specifically for "how to root Aglaonema Red Anjamani in water", I confirm that water propagation works beautifully if you change the water regularly and keep only the node submerged. I saw root initials appearing by day 6 with this method.
If you’re looking for "Aglaonema Red Anjamani cutting care after propagation", my advice is to maintain high humidity for the first 10 days after potting. This eases the transition and prevents leaf tip browning. New growth typically appears within 3-4 weeks after potting.
And if you’re wondering about soil mix for Aglaonema propagation—don’t overthink it. A chunky, airy mix with perlite works wonders. I’ve also used a 50/50 blend of peat and perlite with success, though bark is better for long-term stability.
Personal Thoughts on Propagation Timing
I’ve propagated this plant in spring and early summer with great results. Colder months? Not so much. Light levels drop, and cuttings take forever to root. I tried once in November and waited nearly a month with barely any growth. Spring is the sweet spot.
That said, if you have a grow light and keep your home warm (above 18°C/65°F), you can probably make it work year-round. But why fight the plant’s natural rhythm? Work with its cycle, and you’ll have an easier time.
Frequently Asked Questions
Q: Can I propagate Aglaonema Red Anjamani from a single leaf? A: No, a single leaf without a stem node won’t produce a full plant. It might root, but it won’t grow into a new plant. You need a stem section with at least one node for propagation to succeed. I’ve tested this, and leaf-only cuttings just sit there, eventually fading.
Q: Should I use rooting hormone for this plant? A: It’s not mandatory, but it speeds things up. I noticed about a 3-day difference in rooting time. If you have hormone powder on hand, use it. If not, you’ll still get roots, just with a bit more waiting. Either way, let the cutting callus first.
Q: What’s the best time of year to take cuttings? A: Spring is ideal. The plant is actively pushing new growth, and cutting stress is minimized. I’ve also had success in early summer. Avoid deep winter unless you have supplemental lighting. Your cuttings will thank you for starting when the weather warms up.
Q: Why did my cutting rot even though I didn’t overwater? A: Maybe the cutting was taken from an unhealthy part, or the tool wasn’t sterilized. Also, direct sun can cook the tissue, causing soft spots. I always sterilize my shears now, and I make sure the mother plant has been watered a few days before cutting—hydrated but not wet stems root better.
Q: How long until my propagated plant looks like a full, mature Aglaonema? A: Patience is key. After transplanting, expect visible slow growth for the first few months. With proper care, you’ll see a new leaf every 4-6 weeks. A full, bushy plant takes about a year. I’ve got cuttings that are now 8 months old, and they look gorgeous—full clusters of red-tinged leaves.
Final Thoughts That Actually Help
I still remember my first failed propagation attempt, watching five cuttings rot in a week. It felt wasteful and maddening. But once I understood the basics—callus, node placement, and moisture balance—everything clicked. Now, propagation is one of my favorite parts of plant keeping.
There’s a quiet magic in snipping a piece of your Aglaonema Red Anjamani and watching it transform into a standalone plant. It feels like creating life from life. And once you get the hang of it, you’ll probably never buy another mature plant again.
Give it a shot. Take one cutting first, not five. Learn from how it responds. And remember—most problems come from giving too much care, not too little. Ease up, let the plant do its thing, and you’ll be rewarded with roots in about two weeks.
If I can do it after killing my fair share of plants, you absolutely can too. Happy propagating.





